Recently, I was working on a small procedural generator where I needed AI-generated descriptions. With no prior experience in the field, I decided to dive deep into LLM (Large Language Models) and figure out how to run them locally. On top of that, I wanted the responses to be based on information I had stored inside a PDF.
I found plenty of information on how to do it with python, but I really wanted to do this with Node JS. Unfortunately, there wasn’t much information for that… so I decided to document the journey myself. Join me in building a Retrieval-Augmented Generation (RAG) pipeline!
Core idea
The goal is to use a language model on top of a custom PDF. That way, the AI can understand, summarize, or analyze your own documents, while keeping everything local and private. This technique is called RAG (Retrieval-augmented generation): a technique that enables AI to incorporate external information in its database, in this case, from your PDF.
We will be using the following tools:
- Ollama: for running the LLM.
- LangChain: to simplify file processing the file.
- ChromaDB: for saving the PDF data once processed by AI.
- Optional: Docker: for running a ChromaDB server as a docker container.
Prerequisites
Although it’s not a very advanced topic, you will need the following knowledge:
- How to start a node js project and use npm.
- Basic knowledge regarding Large Language Models.
- Familiarity with command line operations
- Having either Docker or Python to use a ChromaDB Server. Check this to use Chroma locally.
Architecture overview
Let’s have a look at what we need to built:
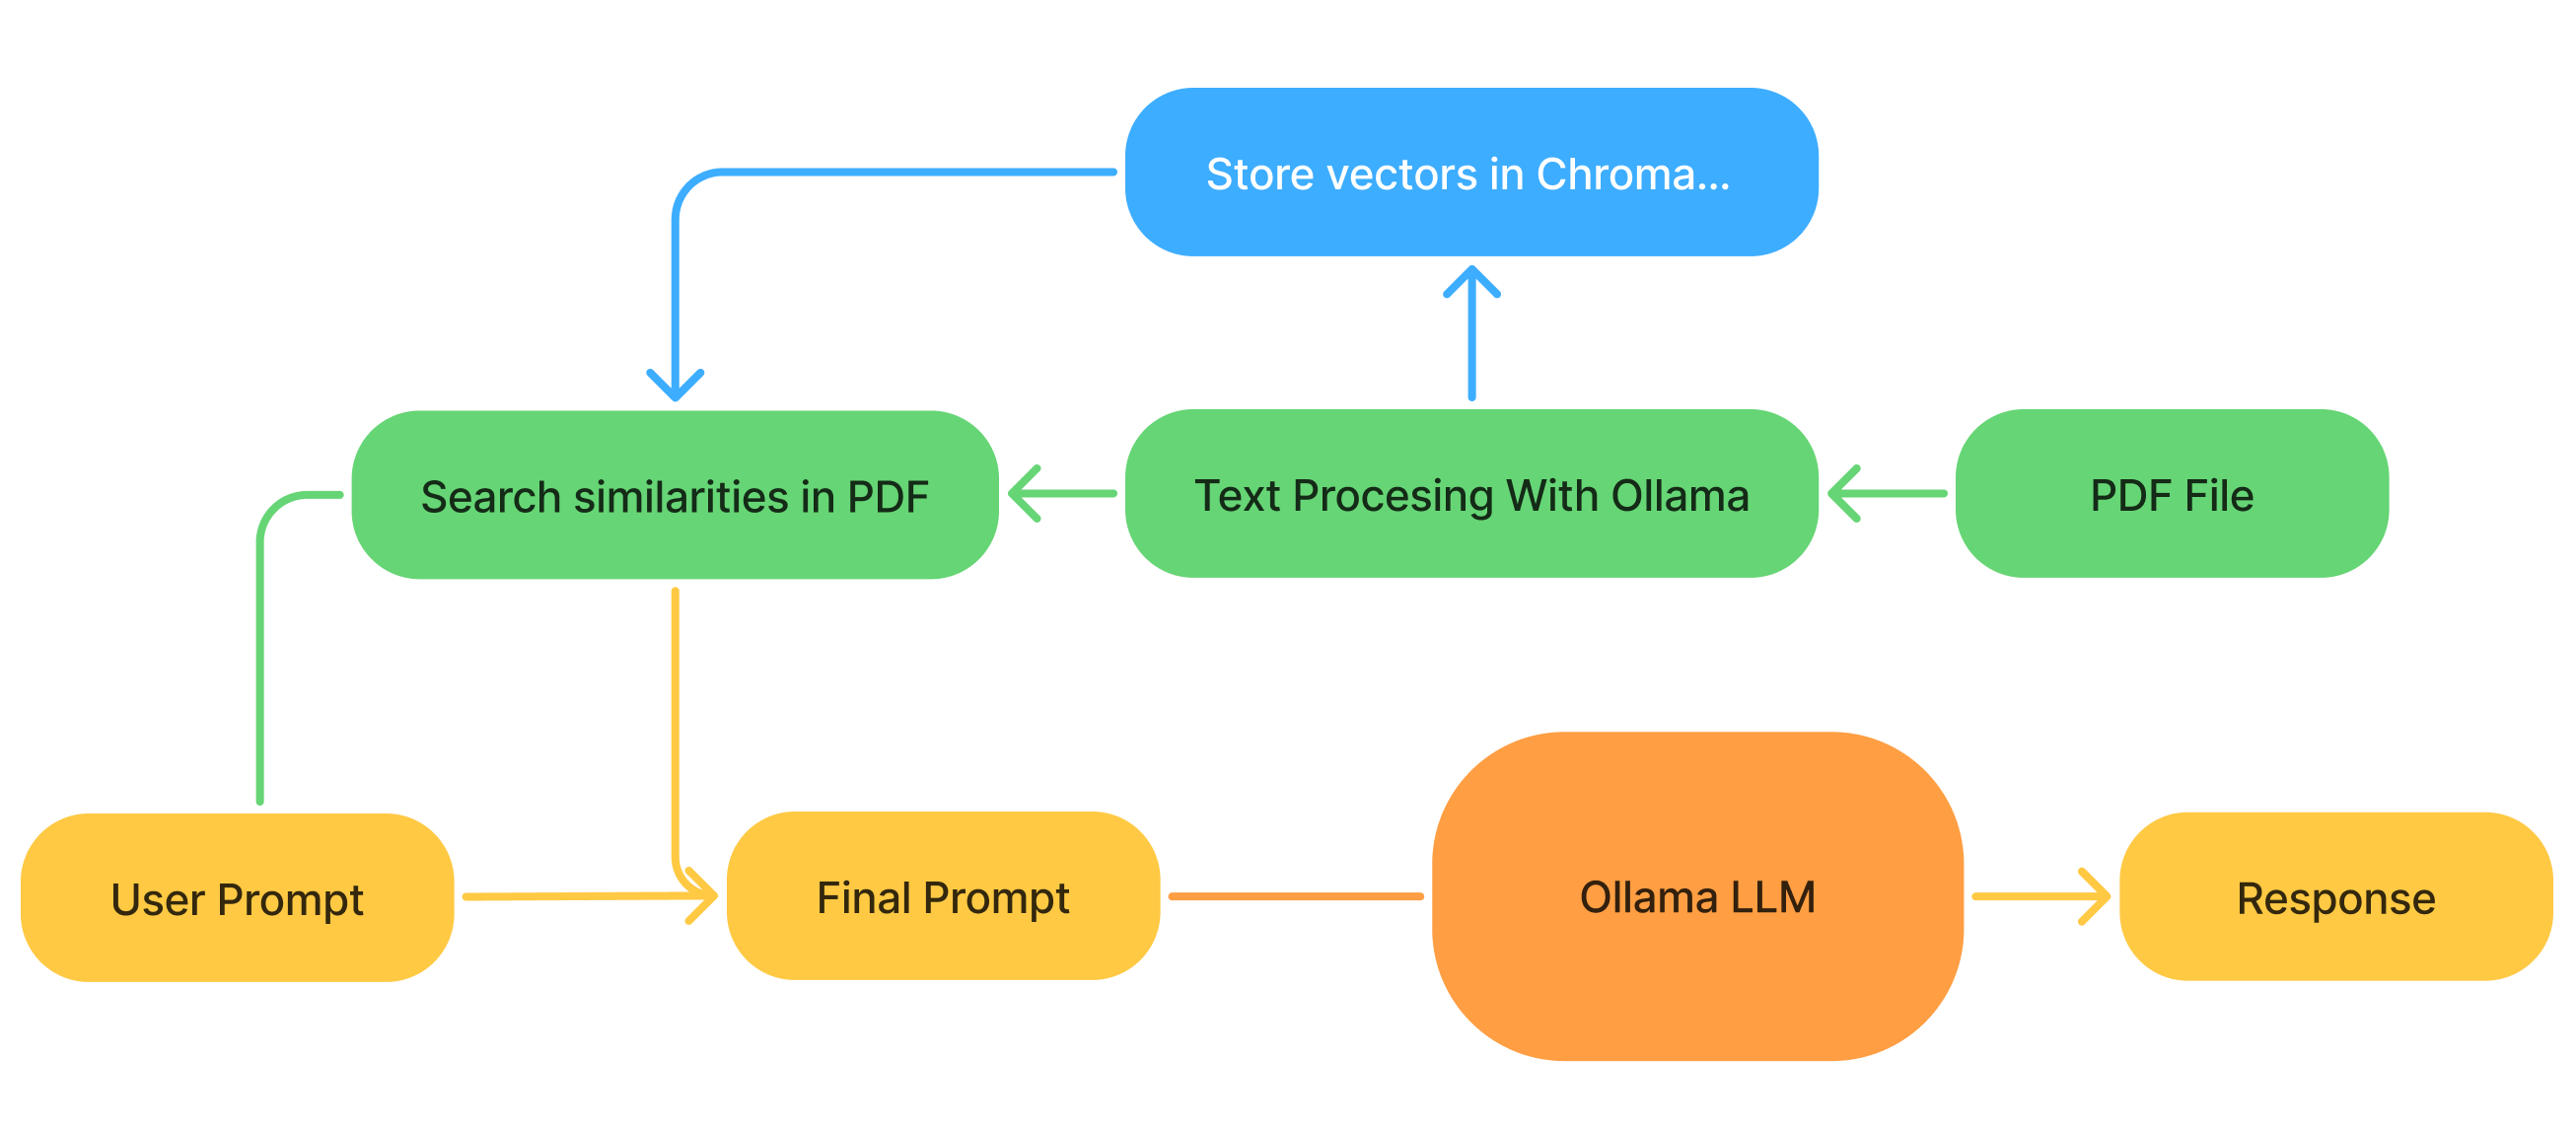
- Extract the data from the PDF and convert it into an AI-friendly language (with a specific Ollama model).
- Store this data to retrieve it later.
- Find relevant chunks of information for the user prompt in the stored data.
- Pass both the question and the retrieved context to the LLM, which then generates an answer.
Step-by-step guide
Step 1: Install the dependencies
Let’s start installing the required npm packages:
1 | $ npm install ollama pdf-parse chromadb @langchain/community @langchain/core @langchain/ollama |
Then we get the desired Ollama model. In my case I will use Deepseek-r1:8b, but it’s quite large and you will need a decent GPU. You can download any other ollama model you like (personally I recommend mistral to begin with). You will need also a model for processing the pdf, in this case, go with nomic embed text.
1 | $ ollama pull deepseek-r1:8b |
We can start creating a .js file and importing the modules:
1 | import ollama from "ollama"; |
Note that you have to be running an ollama instance in order for the program to work. You can start one with Ollama serve in the CLI.
Step 2: Process the PDF and store vectors
First, create a loader with the LangChain function PDFLoader and extract the text of the file. Then we split the text extracted into chunks to store the data.
1 | const loader = new PDFLoader("/path/to/PDF file", { splitPages: false }) |
Splitting the text is crucial for the AI to find similarities. Later, you can customize these parameters:
- ChunkSize: How many tokens (characters) will be in every chunk.
- ChunkOvelap: How many tokens will overlap with other chunks.
Then, we will translate the chunks into AI friendly language. Those are called vectors, and we will store them in ChromaDB.
First we initialize the Ollama model to create those vectors (or embeddings). Here I will use the Nomic Embed model. Then I will use the model to process the text chunks and store them on a Chroma Database local server. If you don’t know how to use Chorma click here. In my case, I am using a docker container to run Chroma locally.
1 | const embeddings = new OllamaEmbeddings({ |
Obviusly, you can use another form of storage to save those vectors. In fact, LangChain supports a lot of options.
Step 3: Run the model
Now let’s put everything together and actually query the model. We start by searching for similarities between our question and the content of the document. Then we make a new prompt that will use our main LLM.
1 | const query = "Your query (Ex: What can you tell me about 'X' topic?)" |
Here we can see that we use the option TOP_K, this means how many chunks we will get when finding similarities. The larger this number, the more context AI gets, but also the slower it will be. You can also experiment with another prompt to see if it results in better responses.
Finally, we run the model with our new prompt.
1 | const response = await ollama.generate({ |
Right now, the query is hard-code, so this isn’t a standalone program. From here, it’s up to you how you want to integrate it with your app.
Check the whole code here!
Improvements
In this version, we are generating the vectors every time we want a response, but there is a better way to do it; we are using a database for something. We can check if the embeddings for this file are created by adding this before generating the new ones:
1 | const existingVectors = await Chroma.fromExistingCollection(embeddings, dbOptions) |
Conclusions
This setup is a simple but powerful way to give your AI access to your own documents while keeping everything private and local. Moreover, after some testing, I can say that the results are pretty solid, even with the smaller version models.
You now have the building blocks for a RAG pipeline with Node.js, Ollama, LangChain, and ChromaDB. From here, you can expand it into a full app — maybe a chatbot, a document assistant, or even part of a larger system.
Chek out my other post about Machine Learning: Applying Reinforcment Learning to Prisoner’s Dilema.