Why I Needed a Custom Setup
When I started my university classes, I realized that taking notes by hand wasn’t effective for me. I was left with a pile of papers covered in illegible scribbles that I rarely referred to later, so I researched and evaluated different solutions.
I found Gilles Castle’s setup for generating notes with LaTeX using the Vim text editor and custom snippets in a Linux environment very interesting. I set up a Linux virtual machine dedicated solely to note-taking. However, the performance was very poor on a virtual machine and there was a considerable keyboard input delay. A year later, I decided to build my own Windows-based environment for taking notes with LaTeX. Check out an example of my notes here.
Join me in setting up a fully functional LaTeX environment from scratch, where everything is completely customizable and local. This means you won’t have to worry about privacy, internet connection or paying for a platform subscription.
The Big Picture
Here’s the main idea:
- Open the files from my custom application, where I have all my documents organized.
- Edit notes in class as you go with a customized version of VS Code.
- Compile the .tex files using a local Latex distribution (e.g., TeX Live or MiKTex).
- Use Sumatra PDF to view the file.
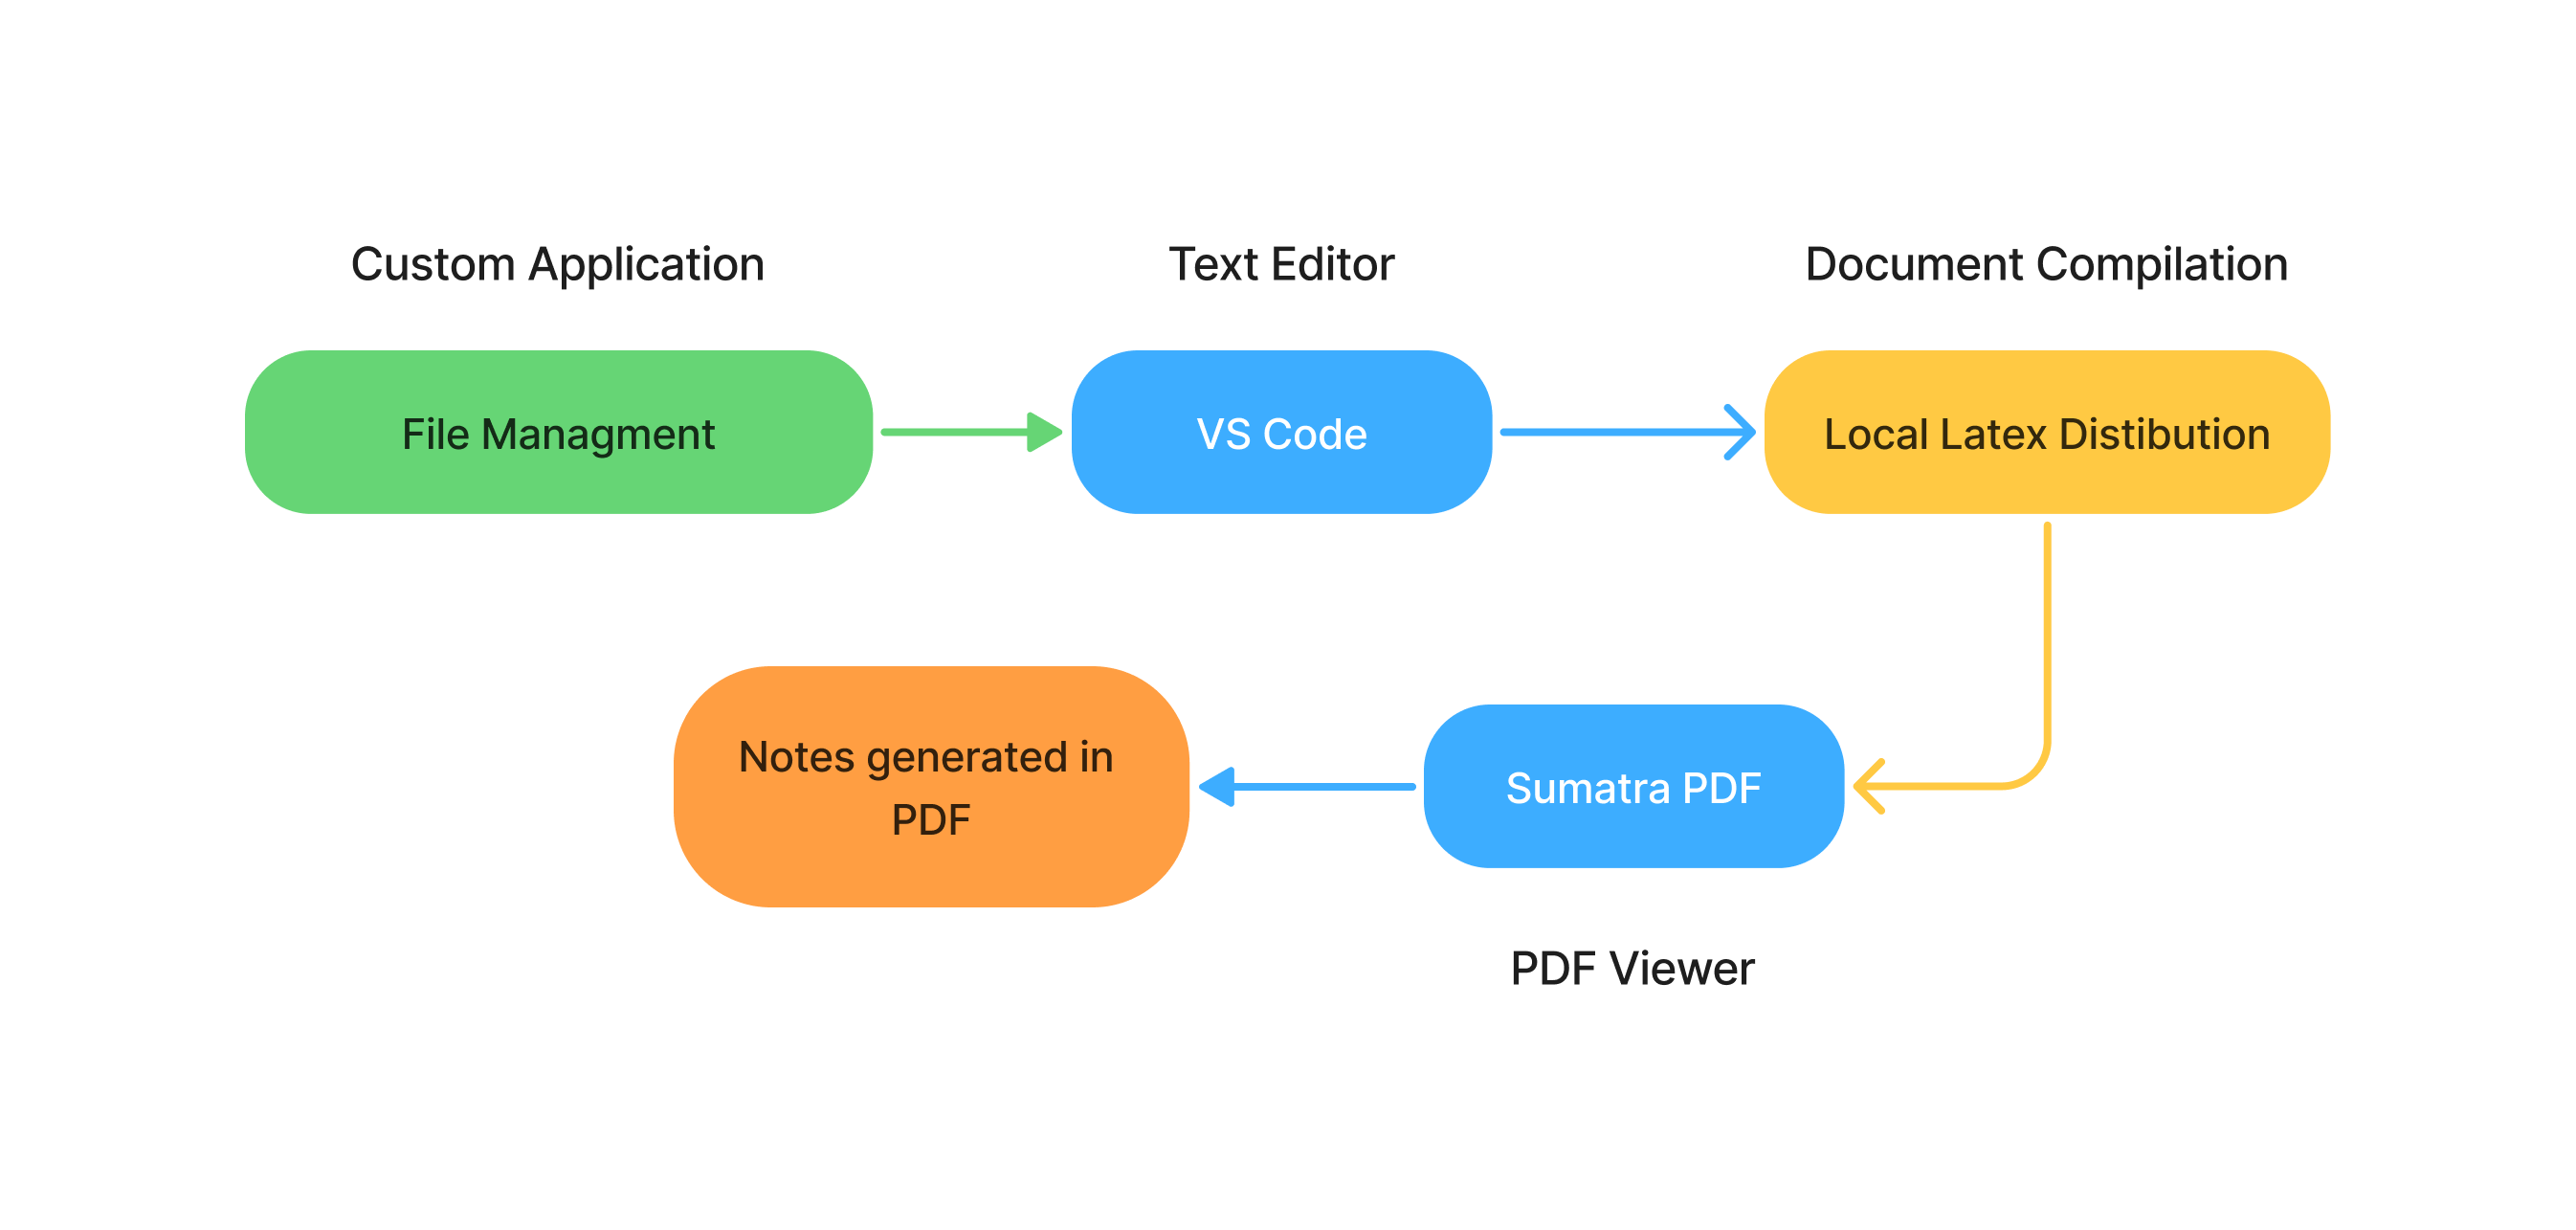
The first step is optional if you have your notes organized in folders. You can use any PDF viewer to view the PDFs, including one that is integrated into VS Code. I have chosen Sumatra PDF because it is lightweight and compatible with the generation of .tex files.
Editing notes
First, we need a text editor that is suitable for our .tex files. I’ve decided to use VS Code and customize it to suit my needs. If you’re not using VS Code for anything else (e.g., programming), you can skip the next step.
Creating a separate Visual Studio Instance
You may find, like me, that if you use VS for other tasks (such as developing applications), you don’t want your specific LaTeX configuration to affect your well-established programming setup. To do this, we will start by creating a folder called VSLatexConfig. Inside this folder, we will create two new folders: user-data and extensions. We can start VS and take notes using the following command in the command terminal:
1 | code "/path/to/notes_directory" --user-data-dir="/path/to/user-data" --extensions-dir="/path/to/extensions" |
You don’t have to type this command in the terminal all the time. You can create a .bat file, for example.
Customizing Visual Studio Code
When VS Code is open, the first thing we will do is install the LaTeX Workshop extension. This will be the foundation for our environment. You can set up this extension and the program itself in many ways. Below, I will give an example of my choice. Try changing the settings to see what works best for you.
In VS Code, press F1 and type ‘Preferences Open User Settings (JSON)’. This will open a settings.json file, allowing you to configure the editor to your liking. Alternatively, you can edit the settings from the Visual Studio UI if you find it easier. This is what my settings.json file looks like:
1 | { |
The main objective of this configuration is to have an editor that is as clean as possible. Notable features include immediate file compilation when saving, without the logs window opening that takes up editing space (it only opens in case of error). I have also customized the editor theme and removed the mini-map that usually appears on the right of such editors.
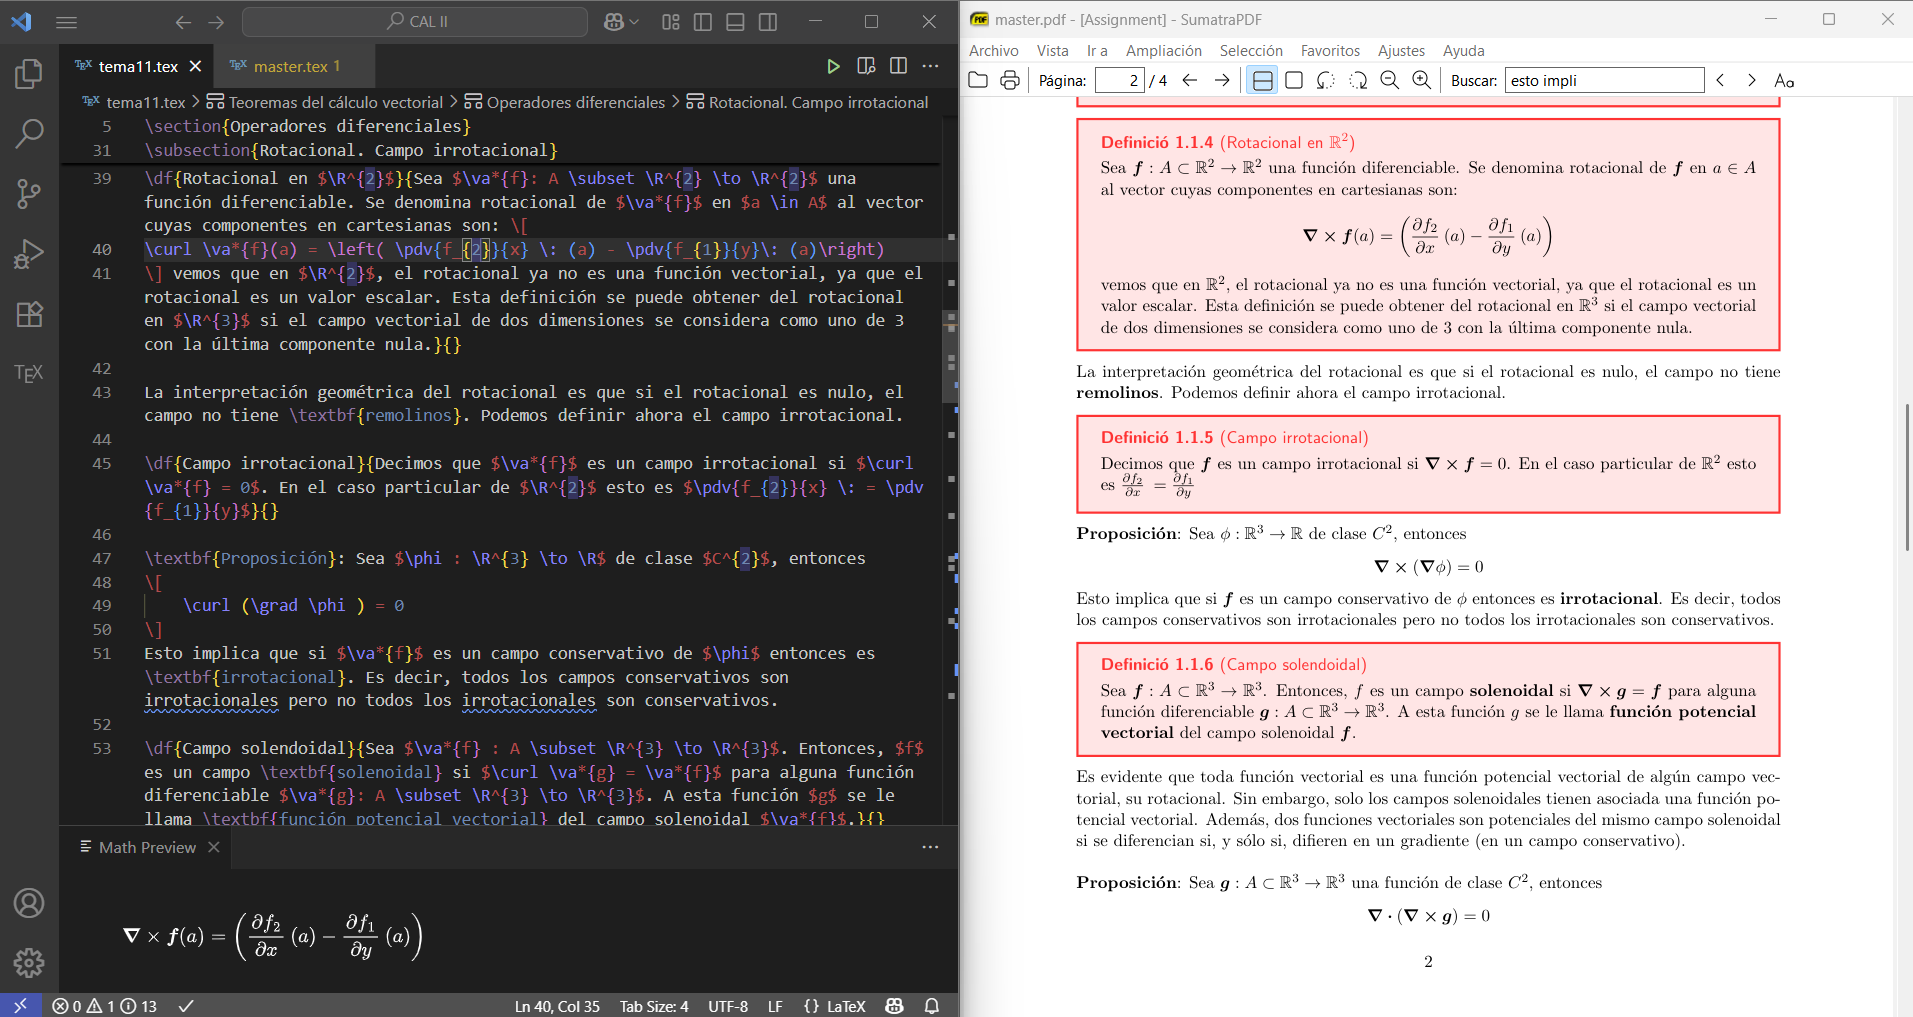
Finally, I set SumatraPDF, which I had downloaded in portable format earlier, as the viewer for the compiled files. This viewer allows forward searching, so you can go from a PDF fragment to the LaTeX line that generated it, and vice versa.
This is what my screen looks like while I edit my notes:
Using LaTeX Workshop
This extension offers a variety of features and tools to assist with LaTeX writing. The most important ones are:
- Tools for compiling documents with various LaTeX commands (latexmk, pdflatex, bibtex).
- Preview the result of mathematical environments by hovering the mouse over them or using the Ctrl+Shift+M shortcut in the math panel.
- A complete symbol library in the left sidebar for quick insertion.
- A variety of custom snippets with easy-to-remember names for inserting all kinds of environments. Here is a list of all of them.
Check out all the features in the official documentation.
Custom Snippets
In addition to the snippets provided by the extension, I like to define my own frequently used snippets. For this purpose, I will use snippets from Visual Studio itself. To begin, press F1 and search for ‘Snippets: Configure Snippets’ and select a LaTeX extension. You can then put all the active snippets in the .tex files there.
Some of my favorites are:
1 | "Inline Math": { |
Or those corresponding to my custom LaTeX commands, which I will discuss later.
1 | "Definition": { |
Compiling notes
In order to compile .tex files into PDF files, you will need to install a LaTeX distribution on your computer along with the necessary commands. For Windows, I recommend downloading TeX Live. Once you have downloaded the installer, you need to select the version you want to install. It is best to download a complete LaTeX distribution with all the available packages and commands. You won’t use many of them, but you’ll avoid compatibility problems and the need for further installations later on, and it only takes up about 6 GB.
The LaTeX Workshop extension allows you to manage the LaTeX document compilation commands installed on your system. I only use latexmk, which automatically executes the simplest commands as many times as necessary to ensure that no cross-references fail in the final PDF. To configure this, you only need to change the LaTeX Workshop recipes and tools in the VS Code settings.json file. Simply add:
1 | "latex-workshop.latex.tools": [ |
Now, when you save a file or want to compile it explicitly, the recipe Main file latexmk will be executed, which in turn will execute the command latexmk.
LaTeX Structure: Modular Notes
I use a modular TeX file system. Each subject has its own master file (master.tex), which defines the subject’s general color scheme and uses the LaTeX input command to insert the files containing the subject’s specific content. I also use a preamble file (preamble.tex) to define some general commands. This is what a master file looks like:
1 | \documentclass[a4paper, 11pt]{report} |
Preamble and boxes
In addition to the files for each subject, I have a single file called ‘preamble.tex’ that contains code relevant to all of them. Among other things, I do the following:
- Import all the LaTeX packages that I am going to use.
- Create boxes for definitions, examples, demonstrations and theorems.
- Define new commands or abbreviations.
- Create a custom index or table of contents.
One of the highlights of my notes is my use of the tcolorbox package. In the preamble, I defined a series of environments for definitions or theorems, which I use across all subjects. The boxes in each subject will have a different color, which is defined in master.tex. The code for my definition boxes is as follows:
1 | \newtcbtheorem[number within=section]{definition}{Definition} |
And we can use later with:
1 | \df{Title}{Body}{Label for citations} |
This makes the notes more visually appealing, highlights important points and ensures consistency throughout. You can see the result in the next section.
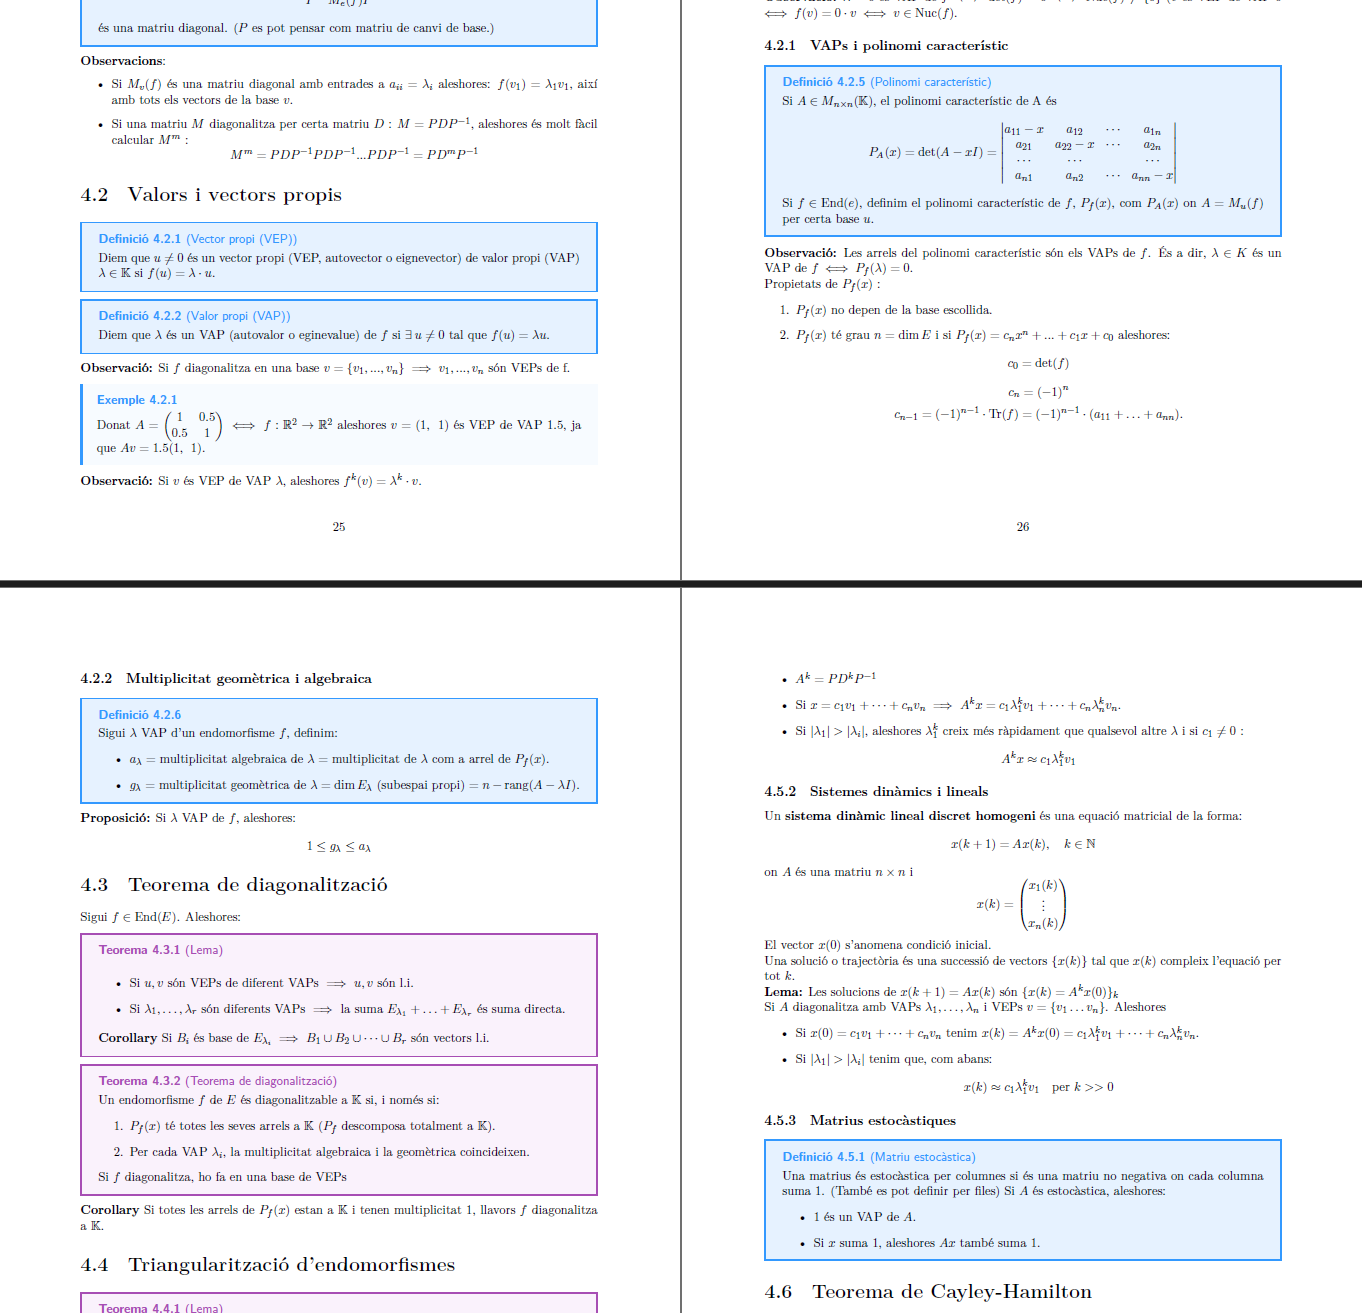
What My Notes Look Like
You can see what my notes look like once finished below. Here are some examples of algebra and organic chemistry:

Conclusions
Thanks to this setup, I now have a quick yet thorough way of taking notes in class while the teacher is speaking. Although I sometimes have to review and improve my notes, these are usually only minor changes or spelling corrections. In addition, the final PDFs are useful not only for studying, but also for learning while you are creating them. You’d be surprised how much you remember just by trying to make coherent and well-explained notes.
Finally, although there are some disadvantages to switching from Linux to Windows, it has greatly improved my computer’s performance. It is not advisable to use a virtual machine on a mid-range laptop. Moreover, I can now also use it with my custom desktop application, which I discuss in more detail in this other post: Notes Manager - An Electron app to organize LaTeX notes.
If you’re considering moving your class notes to LaTeX, I recommend experimenting with a small setup first. Once you get comfortable, a customized workflow like this can save you time and give you professional-looking notes.
Acknowledgments
This workflow wouldn’t exist without the inspiration from Gilles Castel’s blog, which first introduced me to the idea of taking lecture notes directly in LaTeX. You can check out his excellent series here.